Embellishment Class with Julia Snyder

Standard

On Friday I had the opportunity to take an embellishment class with Julia Snyder.  You may know Julia from her wonderful stitch books – Just Stitches I UseiBargello, and Have Stitch Will Travel to name just a few.  I had been told that taking a class with Julia is not to be missed so I ventured to The Enriched Stitch in Wilton, CT, for this class.  I did drive up on Thursday night so that I would not have to contend with Friday morning rush hour traffic between New Jersey and Connecticut. Fortunately there were no major traffic problems and the only slowdown was the last four miles on the Merritt Parkway.

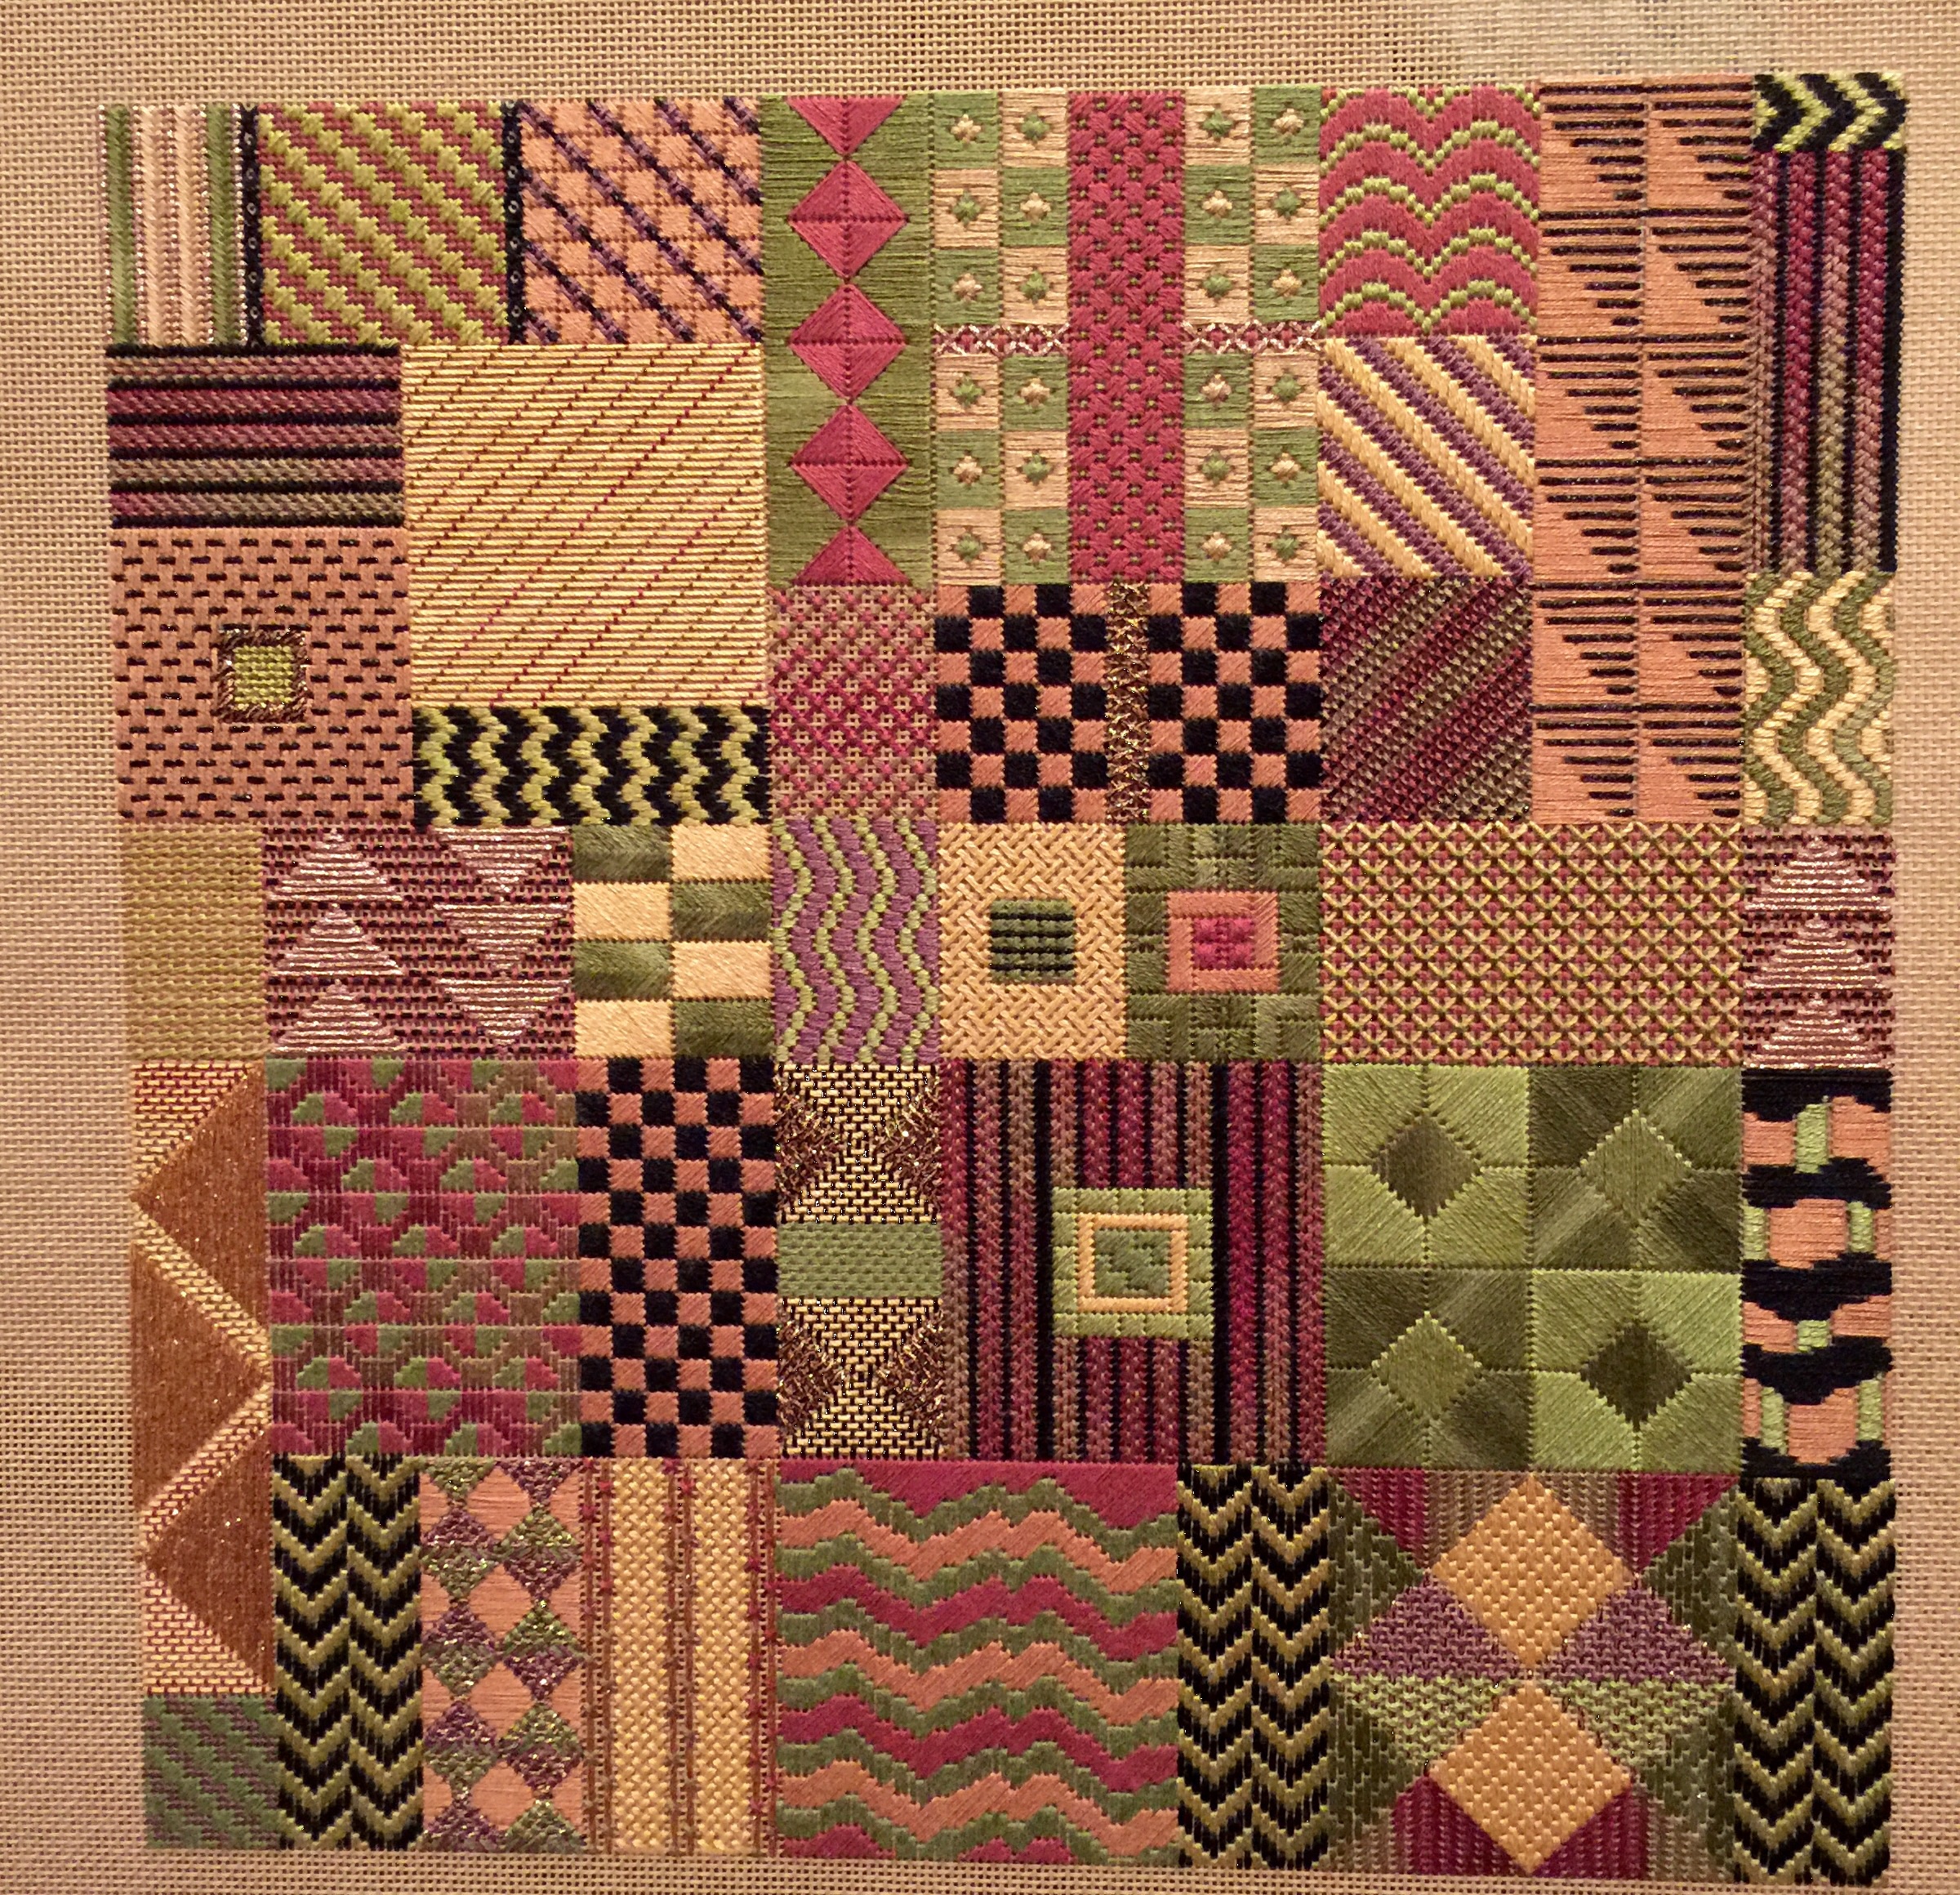
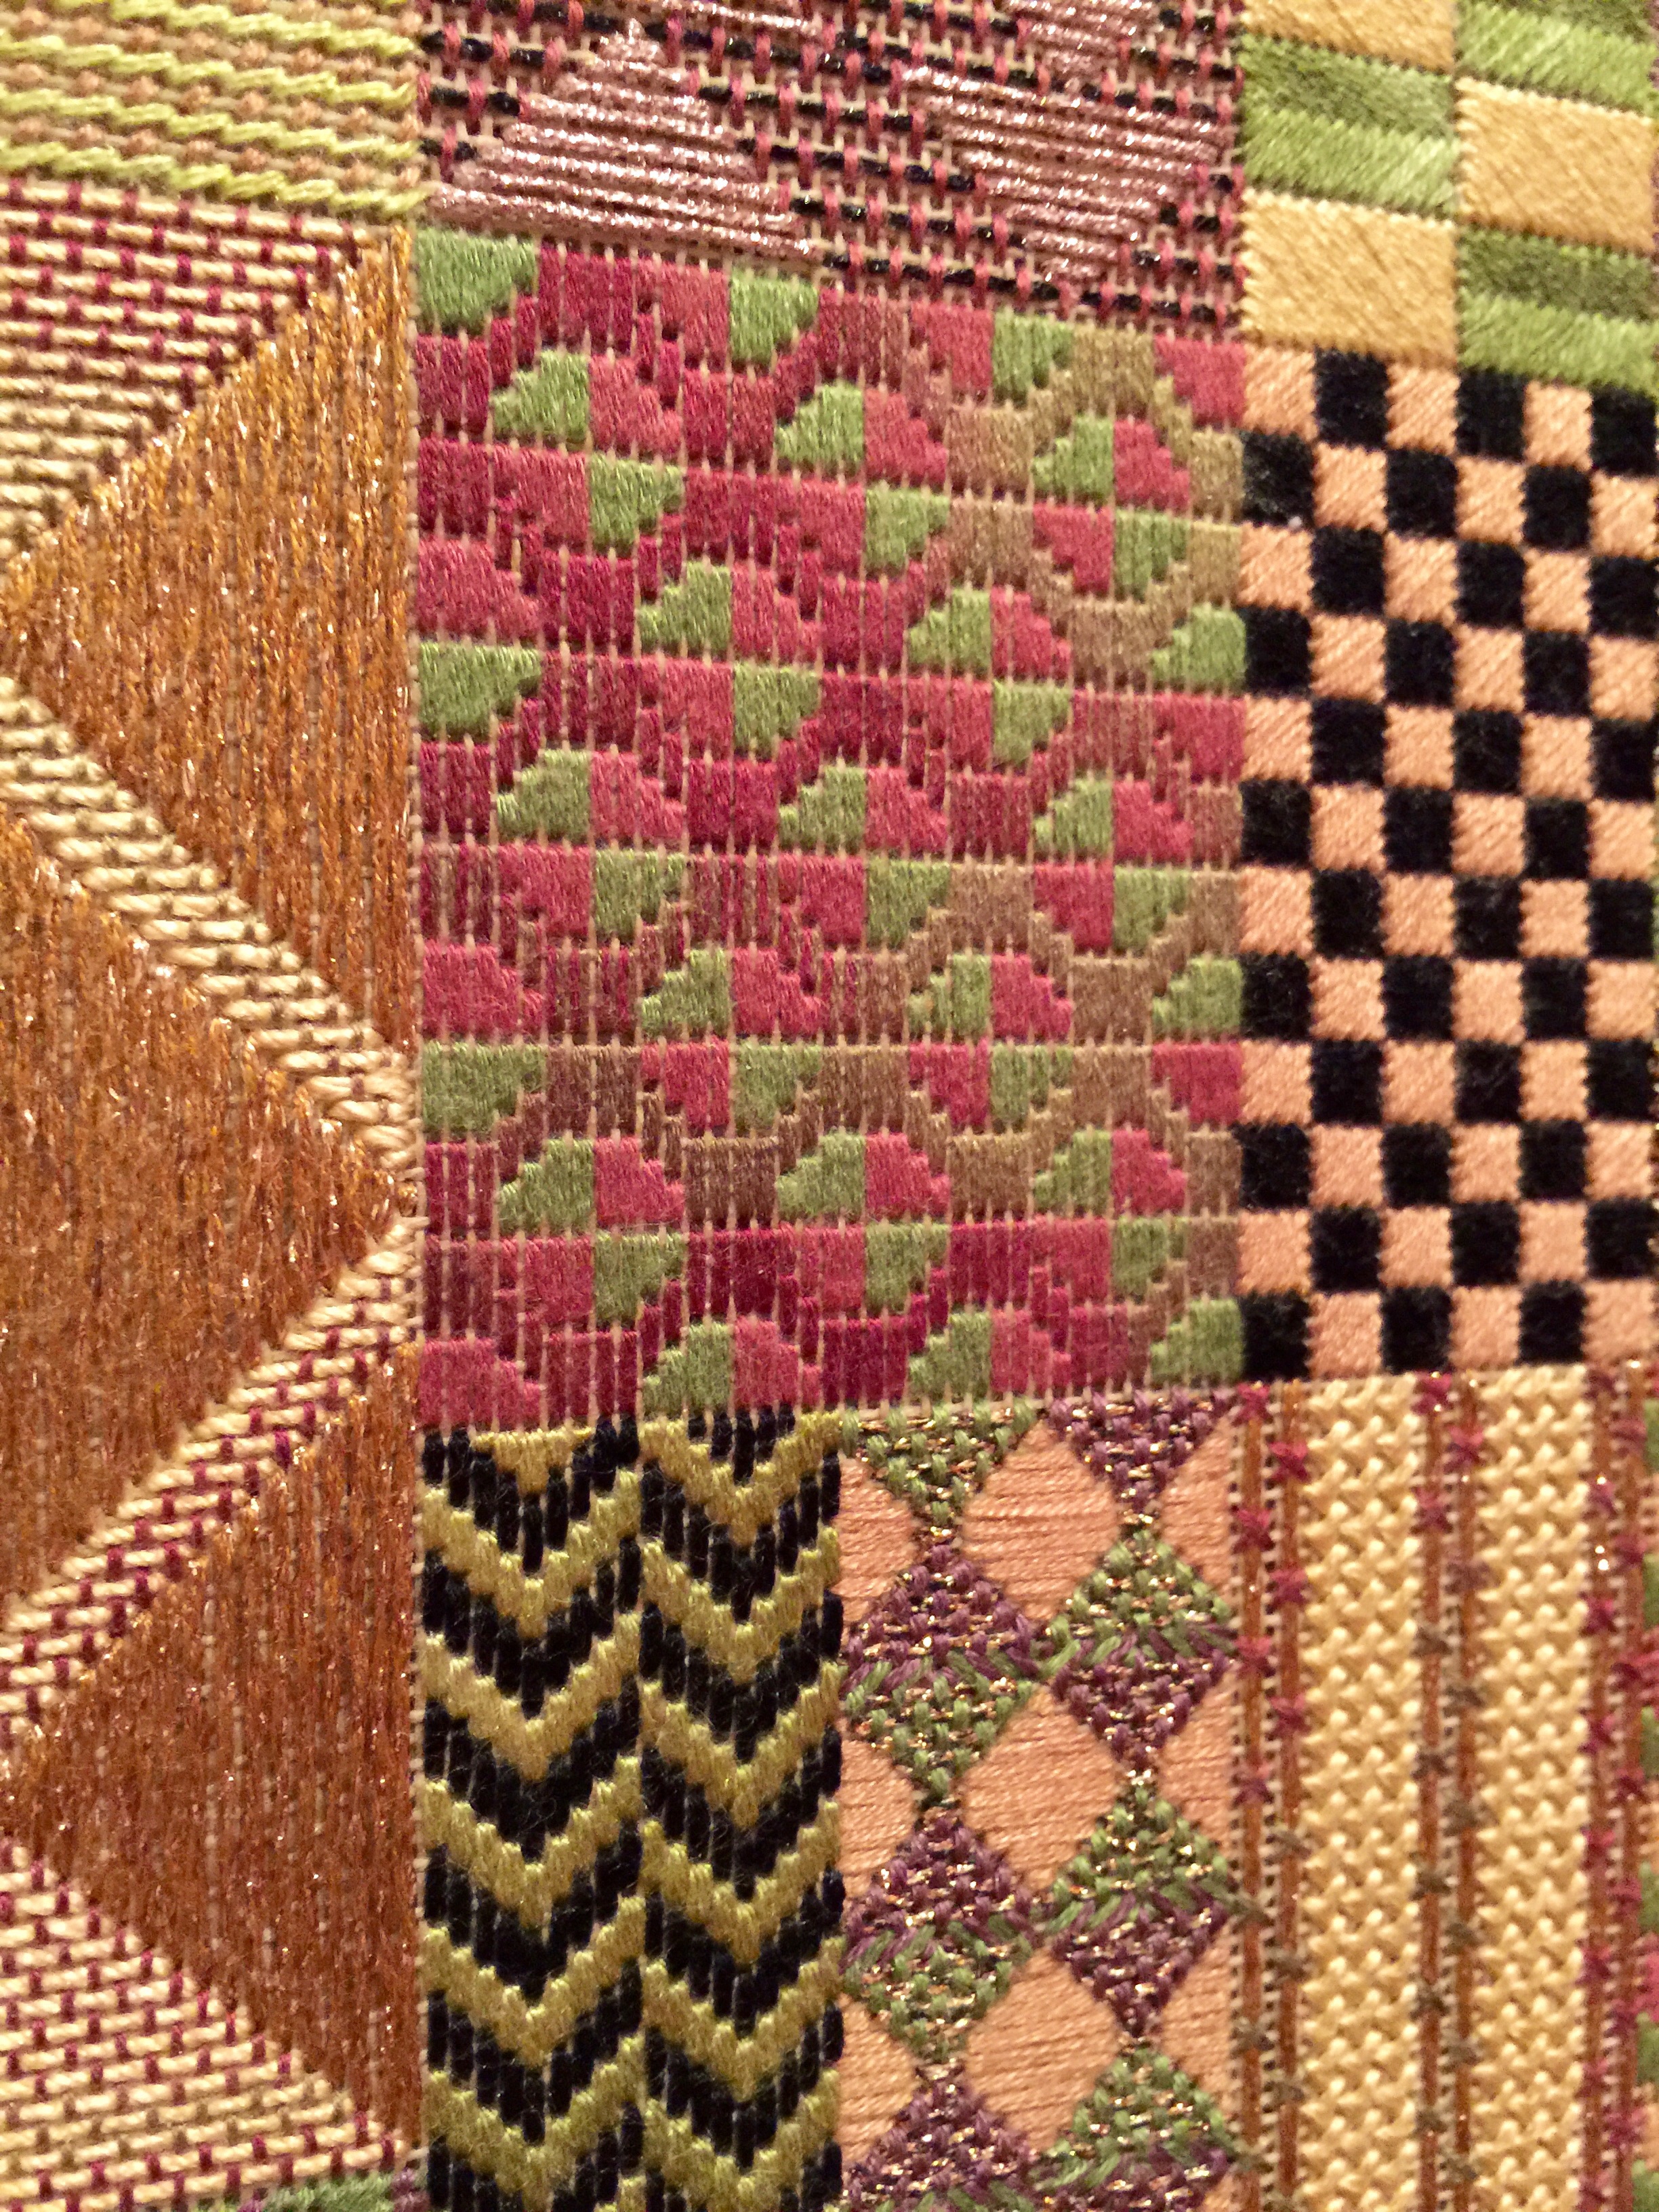
I chose a canvas from Ewe and Eye and Friends, Funky Flowers, for this class.  I wanted something small since I have so many other projects in the works, yet with enough variety to experiment.  The actual design size is about 8″ x 10″ on 12″ x 14″ stretcher bars so it is a nice size.

EWE-458

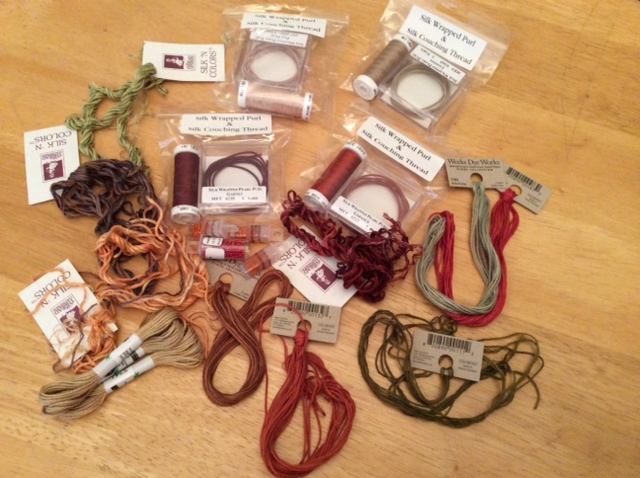
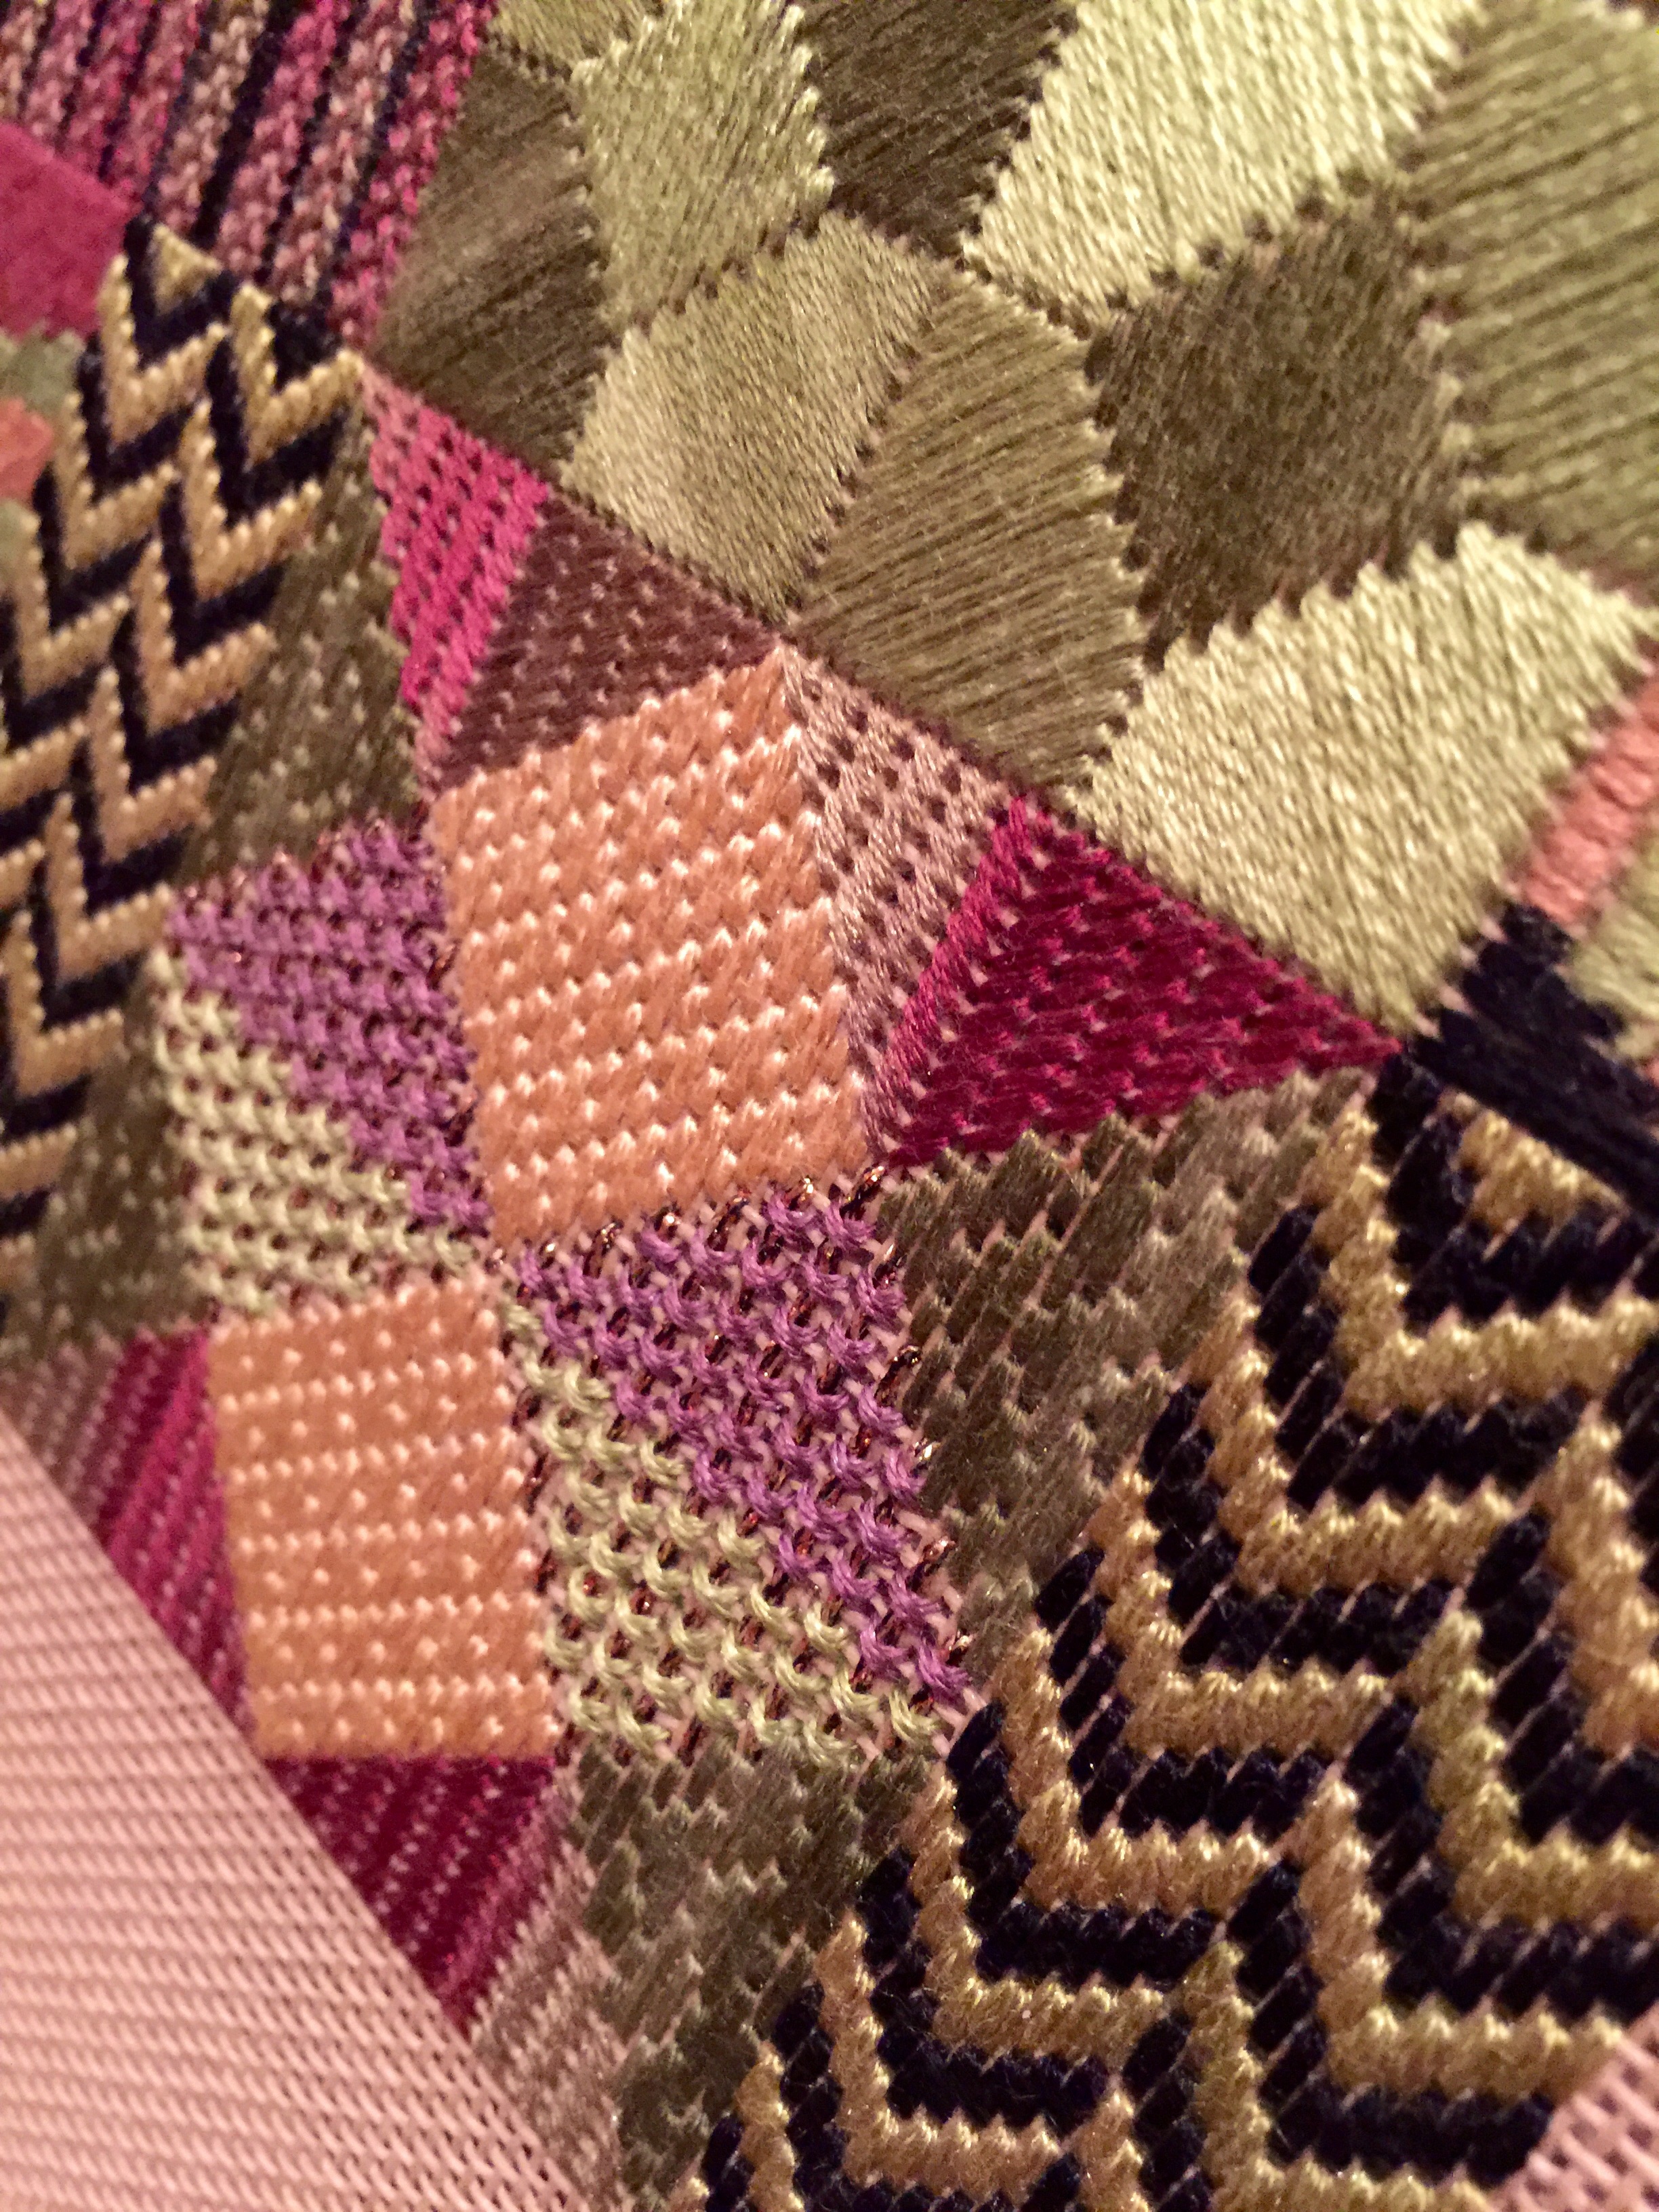
In this class format Julia spends time with each student going over the canvas, discussing the areas that should be emphasized, and selecting threads and stitches.  Half the fun of the class is wandering around the shop (which, by the way, has a terrific selection of threads) picking out threads – like a candy store without the calories!  As you can see, I have a lot of Weeks Dye Works threads for this canvas.  I am also using Silk Wrapped Purl, a new thread for me, for the very light flowers as well as the ribbon around the flower stems.  This “thread” is silk wrapped over copper wire so it can be formed into shapes.

Thread Selection

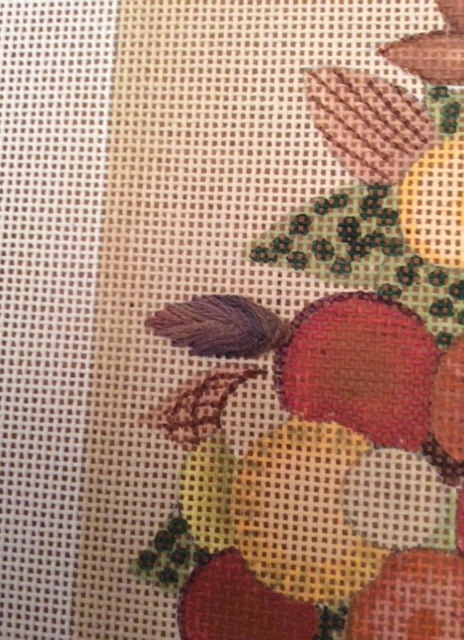
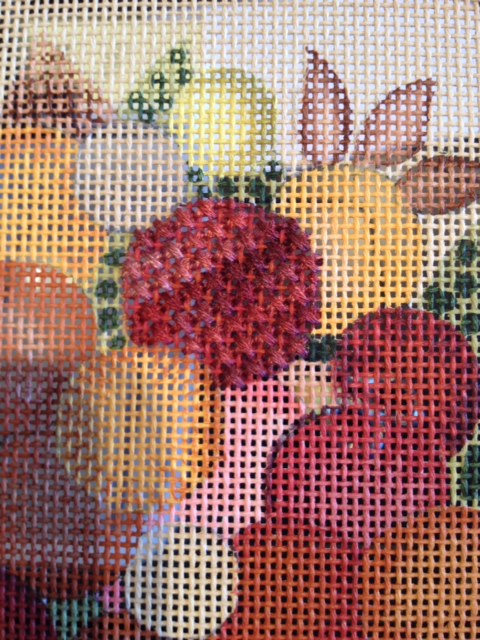
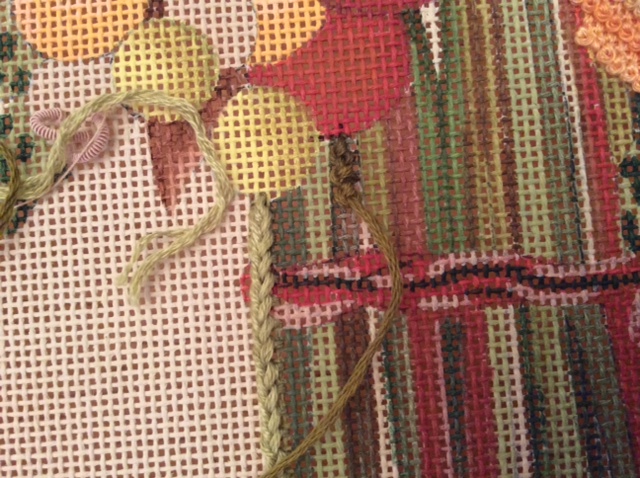
Julia suggested a few new stitches that are just fabulous (at least I think so) for this piece.  The brown leaves are Raised Closed Herringbone and the light orange flowers are French Basketweave which is a row of basketweave with a row of French knots.  I did not stitch the French knots quite right so I will probably restitch that one flower.  The green flowers are Rhodes Within a Jessica Within a Jessica and the Burnt Orange Flowers are Staggered Crosses.  The stems will alternate Palestrina Knot, Peruvian Loop, and Wrapped Chain.  There are more stitches for the other flowers but I’ll leave that for another post!

Leaf French Basketweave Orange Flower Rhodes Jessica Green Flower Staggered Cross Burnt Orange Flower Flower Stems

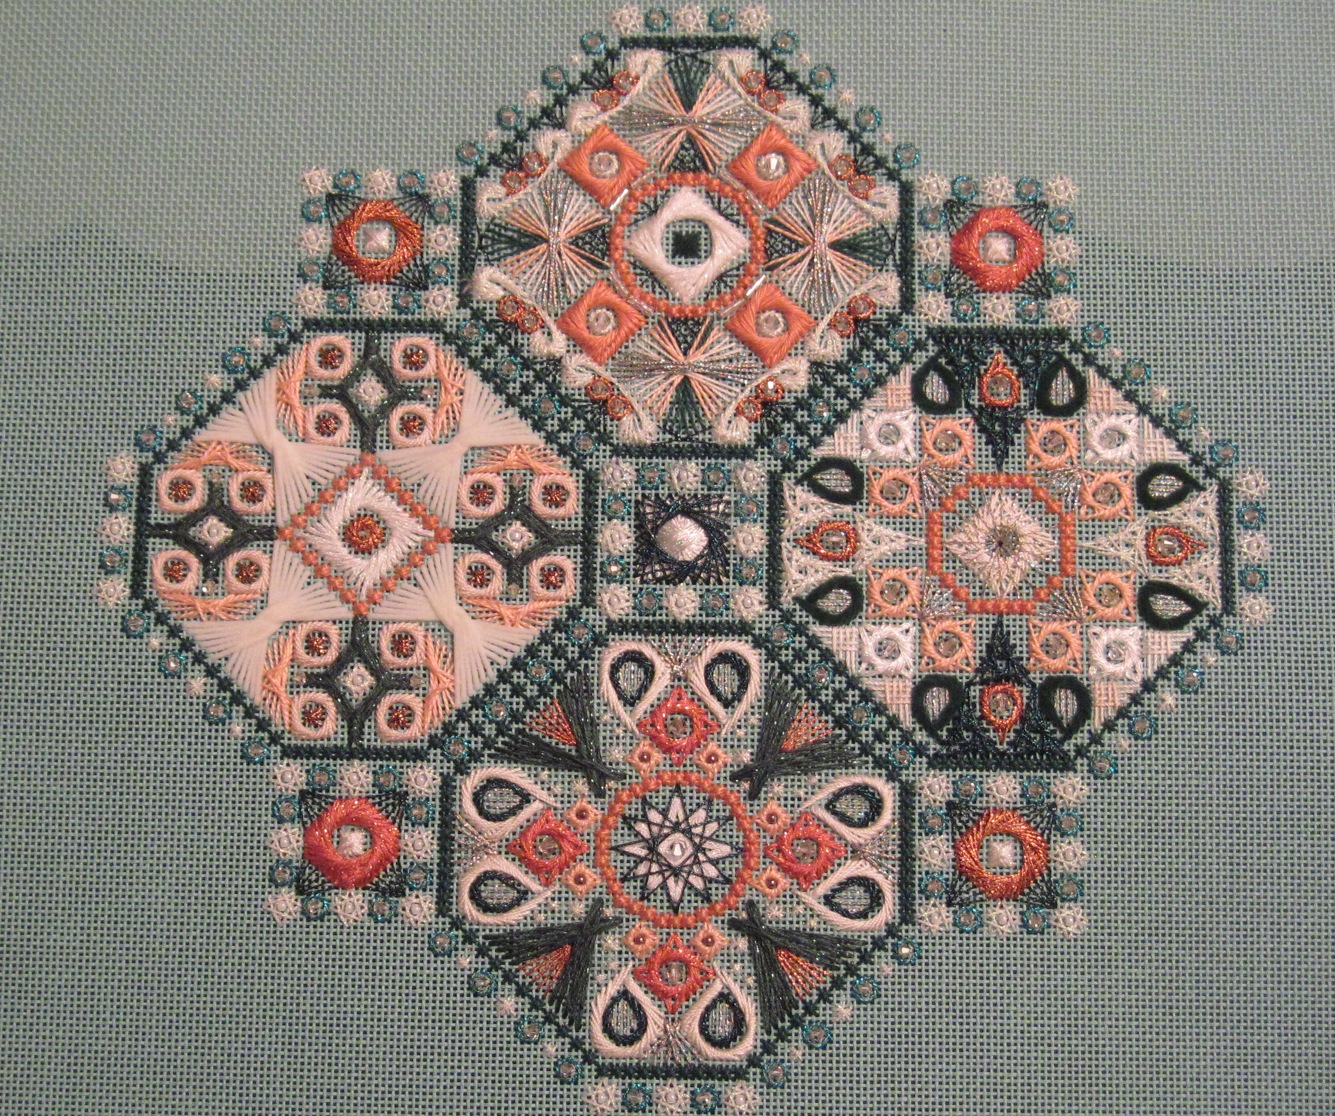
So at the end of the class, this is what I had accomplished.

Day 1 Progress

The class was thoroughly enjoyable and Julia is a sweetheart with a wealth of knowledge.  I would definitely take another class with her if given the opportunity.  You can follow her at Have Stitch Will Travel.

I did come home with one of her books to add to my library.

Just Stitches I Use

And, I would be remiss in not saying “Thanks” to Suzie Vallerie and the wonderful women at The Enriched Stitch for hosting and facilitating this class.  It was a fun day with a good mix of canvases.  I think we all learned so much from Julia and from each other.

Happy Stitching!

A Visit to Morven Museum in Princeton, NJ

Standard

I went with a friend to Morven Museum in Princeton on Sunday to see the exhibit of schoolgirl needlework of New Jersey from 1726 to 1860. This exhibit ends on March 29th. If you live near Princeton, it is well worth a visit. The exhibit is divided by counties into several rooms. Although it is poorly lit to protect the fibers, you can get close to most of them. Extra lighting such as a flashlight is not permitted, but magnifiers are. Since I knew very little about schoolgirl samplers, I did not realize that one of the ways that the history of a piece can be determined is by the design. Schoolgirls who learned under the same teacher had certain of the same elements in their pieces. In one room there were often pieces done by girls who studied together where you could see this. Although most of the pieces were the type we expect of samplers of that time with alphabets and pictures of animals, trees, buildings there were two maps of northern New Jersey with a few towns whose names surprised me, such as Hamburg and “Sicckasinny”, or some such spelling! There was also a small globe that was done with ink and some stitches.

Of course, the stitching was most often done on very fine linen, much smaller count than my favorite 28 count! There were many more stitches than the usual cross stitch including Smyrnas, eyelets, and many queen stitches as well as beautiful satin stitches. Do not look for correct sizes of things. One squirrel in a tree looked more leopard like in size! The most common thread that we saw was silk with some wool and some cotton. There was berlin work done in wool to be seen.

There were two difficulties in the exhibit, the low lighting which was needed as well as the pieces hung so high that those of us using bifocals or readers ended the day with a very sore neck! Unfortunately, as there are no chairs or benches on the rooms for resting, you just need to persevere! It is well worth it. There is parking on the premises as well as a gift shop. If you want to go, check out the website for days and times. http://www.morven.org.

Sue

Into the framers!

Standard

Even though I have spent most of the last week at home, it has been productive as I have spent time stitching as I listened to audio books. I was able to complete American Mosaic, a map of the United Stares. It is the class that both Heidi and I took in Chicago this past August. It was a piece I thoroughly enjoyed seeing come to life. Seeing Heidi's completed inspired me to get back to it.

American Mosaic

I also added a couple of rivers that were not on the original which had the Ohio and the Mississippi rivers. I added the Delaware River for New Jersey, my home state, and the Columbia River between Oregon and Washington for a few wonderful vacations spent out there.

That is three completed seminar pieces and two to go!

Sue


Sedona: Cathedral Rock complete!

Standard

This was a class that I took at the EGA Seminar in Phoenix last October. Sedona: Cathedral Rock, a class taught by Lois Kershner based on a photo that she took several years ago.

Sedona: Cathedral Rock

Shading was done in a variety of ways. The river used thread blending as well as overdyed threads. The ripples were created by a second layer of the same overdye as the clouds as well as a strand of Bijoux. The red rocks were created by both several different overdyed threads as well as blending two or three different threads. The clouds and the sky were all stitched in a Gobelin stitch and where they were started and ended created clouds, some white and some light blue. After SOTM on Saturday, I only had the sky left to finish stitching and those long stitches covered the canvas quickly! Last to do was apply the painted ultra suede rocks in the lower left. That was difficult because it was hard to get the needle through side of the ultra suede. Good thing that the hemostat is a part of my needlework tool kit! Still have three more seminar pieces to complete!

Sue


Ten “Frankies” now entered in Woodlawn Exhibit!

Standard

Today I drove down to Woodlawn with ten Frankies wrapped and ready to enter in the Woodlawn month long needlework exhibit. It was a very interesting process to enter a piece (or many) Into the exhibit. I could not enter all of them at the same time; each person's piece or pieces were done separately so that the line of people waiting to be processed did not get stopped at the first step. The first woman checked the piece and the entry form. Our work was called “canvas” not needlepoint and the type was multiple stitches. On to the next station with the entry form, the piece and the entry fee. This woman assigned the entry with a number, recorded the number in a notebook along with the entrant's name as well as something descriptive about the piece. With Linda's and Rosie's pieces–two each–she distinguished each by color. This is also the station where the fee was collected. She then passed the sheet on to the next woman who typed the information–name, number, type of work–on a laptop and then printed it on cards: a receipt card and an entry card. On to station four where the frame was examined carefully and any mark or discoloration was noted on the receipt as well as the measurements of the frame. The last woman gave me the receipt as well as a free admission card for that person.

It was time consuming, but the women doing the work as well as the others working for the exhibit were so nice and helpful. I did not need to go to the end of the line each time I got a new piece out of one of my bags or boxes, but was permitted to cut in line. They found a place for me to leave the box and bags as I went through the stations. Each one expressed how happy they were that we had thought to exhibit at Woodlawn and hoped that each of us could come down to see the exhibit. With each piece they would exclaim over the color choices and how beautiful, each looked. Each said it would be hard to pick their favorite color. After the last entry, I sat with the woman in charge of getting together the background information for the guides to have. She took the sheet that I had written and recorded all the entry numbers. If someone asks a guide about all the pieces exhibited by New Jersey Needle Artists, the guide will have more information to give. They hope that it will be possible to exhibit all of these in one room.

I will say, I am happy the weather was good and the traffic nothing out of the ordinary for the drive down and back. I came home with a trunk filled with all the wrappings to give Diane for her trip down to pick the pieces up in April. I hope that many of you will be able to make the trip down to Woodlawn to see the entire exhibit.

Sue

Serengeti on 18

Standard

Serengeti image image

I didn’t intend to jump ahead of the group but after putting the canvas on stretcher bars, 17×17, I realized I wasn’t going to be happy doing this as a travel piece. So I thought I would check out block number one and that led to block number two and three and four and I couldn’t stop myself!

There was a sense of discovery associated with each new block.  Even the repeat areas created a sense of excitement as to how it would add to the overall design.  I was a little disappointed with the bottom row.  I found these blocks to be lazier than the earlier ones and block 44 is charted one thread off, some stitchers will be challenged finding a correct way to stitch this.  I made a mistake early in the row and was one thread long……which gave me the correct number of threads for that block!  Hope you all enjoy it as much as I did!

Rona

Two Finishes, stones and beads as well

Standard

In my last post, just after Christmas, I said that I had finished stitching Jasper, the Toni Gerdes design. I still had the stones of jasper to place on the stitching. On Wednesday I tested several selections and placements and finally sewed them to the piece. Toni gave us many stones to select from, either leopard or autumn varieties of jasper.

jasperI also put the last bead and bicone on A Different View by Kurdy Biggs, the year long SOTM piece that NJNA was doing in 2014, and completing in 2015 if needed. I did not select one of the offered color ways so picked my own. I decided to use green and white on a light jade or turquoise canvas. As I was selecting threads a friend suggested that I add a bit of apricot as well which I did. The apricot led to the use of the copper Kreinik which I really like. So mine has a much more limited palette than the others in the group, but my stress level Was lower as selecting the color and thread I wanted to use for each stitch was always much more limited. When it came time to putting on the beads, I again used a limited variety, white seed beads, a few copper colored beads, 3mm and 4mm bicones mostly in a very lightly colored crystal with a few clear colored crystal bicones as well. Diane directed me to http://www.beadaholique.com where I was able to find the bicones that I ordered. With the advice of Sue R. I used Fireline to attach the bicones. It is opaque and barely shows when carried from place to place on the back. It took me much longer to get all the beads and crystals attached with all the flipping of the canvas from front to back. I am interested in seeing what the framer suggests that I do.

ADiffViewSueCSue

Need Another Project?

Standard

I’m sure you are all looking for another project to do…Here are two I found that might interest you.

RibbonMonogrm

Laura Perin is offering her “Ribbons with Monogram” as a cyberclass, in five different colorways. Registration is open until January 18. Go to  http://www.laurajperindesigns.net/ljp-cyber-classes.html for photos of the colorways and to register. The class starts at the end of February and runs for a month. The complete kit is $58.

And then there is a Kathy Rees mystery class called “Starstruck” offered by the Shining Needle Society, also in half a dozen scrumptious colorways. Registration is open until January 3. You have to be a member to do this class, but membership is free. Since it’s a mystery, there is of course no picture of the finished piece. But it IS Kathy Rees. The class will run from February 1 through June and the piece is large — the cut canvas is 16 x 20. Instructions only are $100, the complete kit (with 22 threads) is $225.

I’m attaching the PDF of the class announcement which includes photos of the colorways. (Note that the announcement says December 31 is the last day to register, but they have extended it to January 3 for people who wanted to pay in 2015.)

Two Finishes

Standard

I managed two finishes this week in between wrapping presents and generally getting ready for the holidays.  Fortunately, Nora has taken over the responsibility for much of the decorating around the house so I didn’t have as much to do this year.  I did get to bake some cookies this year – probably the first time in at least a dozen years.  I did also manage some stitching in between the festivities!  As a result I have two finishes under my belt.

The first is A Different View, our 2014 Stitch-of-the-Month project, by Kurdy Biggs.  I added Swarovski crystal bicones and Mill Hill crystal bugle beads.  I opted for the crystal as I really didn’t want to try to figure out how to distribute various colored beads in the design.  I am pleased with the outcome – just enough bling without being too overwhelming.

This is the overall result followed by some close-ups of the individual octagons.

A Different View - Overall A Different View - Octagon 6 A Different View - Octagon 4 A Different View - Octagon 5 A Different View - Octagon 1

I had a great time stitching this piece – the stitches were challenging and picking my own colors was a great experience.

My second finish was Alicia, a Tony Minieri design, that Gone Stitching in Bergenfield offered as a class entitled “Time to Make the Donuts”.  I didn’t get the connection until it was pointed out that the colorway designated as the original reminded everyone of Dunkin Donuts (duh!).  It reminds me of Rainbow Sherbet and so the piece will be designated for summer display.  I did not manipulate the Watercolours too much – just a bit around the outside row so that I got a pretty good distribution of colors.

Alicia - Time to Make the Donuts

I am now trying to get my temporary stitching room (aka the guest bedroom) somewhat organized.  I will be starting a new class at The Edwardian Needle in early January – Tony Minieri’s Out of Africa as well as our Serengeti project later in the month.  And I have a large project for a gift in late May that I must finish.  So I need to get canvases, threads and instructions into project bags so that I can easily find them.  I think that will occupy me for the next few days.

I wish you all a very happy and healthy new year!

Happy New Year 2015

Jasper completed on Christmas Eve!

Standard

Jasper, a Toni Gerdes piece, was my last class at the seminar in Phoenix but the first one completed. I enjoyed stitching it and found that I learned quite a bit about compensating, especially in the sections with the diagonal lines. I did change both the stitches and threads for two blocks. One had a stitch and thread repeated and neither the stitch or the thread was a favorite of mine. It is the first block in the second row across. I found the bound cross stitch in the map of the U.S. directions for Minnesota. It was about the third try before I hit on one that worked.

The large block below that used the bouclê thread couched on the diagonal. I could NOT find the right hole for the couching and could not even count the laid threads accurately. My first try at altering the design was to change the thread to the Vineyard silk two strands, same troubles, but one strand was too thin. So on to a new diagonal stitch from the map of the states. This time I went with the soufflé variation, the stitch for Missouri, again after a number of test runs. (The state map is on congress cloth v.s. the 18 count here which had an impact.). Next step is adding the jasper beads–tiny polished stones.


Jasper

Sue