Hi Everyone —
This past weekend I attended my third EGA Metropolitan Region Seminar in Madison, NJ. Usually, I just take a class, but this year I was responsible for coordinating the Opportunity Basket Auction. I was nervous about handling the large amount of cash, but in the end everything balanced to the penny and the money was distributed without incident.
I had initially signed up to take studio time because Opportunity Baskets and, DUH, UFO’s! But, when I was in Scotland last summer, I bought a Mackintosh Rose tote bag on deep discount and convinced myself that I had signed up to take Toni Gerdes’ Mackintosh Rose Kimono. So imagine my surprise/disappointment when my registration came and said “Studio Time”.
")
")
The Mackintosh Rose tote bag and Toni’s Kimono!
Luckily, I knew the registrar and was able to change into Toni’s class! Charles Rennie Mackintosh was known for his Mackintosh Rose stained glass windows, but the motif appears throughout his designs.
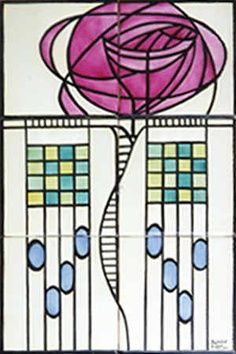
A set of tiles in the Mackintosh Rose design. Can you see the source of Toni’s inspiration?
(As an aside, Toni is doing a series of artist-inspired kimonos: The Wright Kimono taught at ANG in Chicago, The Mackintosh Rose Kimono, The Klimt Kimono to be first taught at ANG in Houston, and The O’Keeffe Kimono in design for ANG Tucson.) Are you tempted yet?
As usual, Toni’s class was awesome and I came away with some new techniques and ideas for use on other projects. One of these was Wonder Ribbon and the other was the best ever use for Flair! Here is my progress at the end of two days:

The Wonder Ribbon appears in the bottom right corner of the design. This ribbon started as about a 3/8-inch wide tube. It stretches when you pull on the sides and goes back to its original shape when you pull on it lengthwise. So you can pull it into any number of shapes; the website says it is good for waves. It comes in five widths. (Carol, do you remember those necklaces we bought in Mexico? Same idea.) Toni had us use two balloon sticks to widen the ribbon to the approximate width that we needed and then tack it down with Accentuate. The ribbon will be stitched over when the design is nearly done.

A close-up of the Wonder Ribbon. Note that you can see the canvas through it!
For any of you who have stitched with Flair, you know what a mess it can be. I promised you the best use ever, so let’s look at rosebud on the Kimono, Here’s a close-up:

The center of the rosebud is Flair that is stretched open and tacked down in exactly the same fashion as the Wonder Ribbon. An oblong Jessica is stitched over it. The Flair fills in the center of the Jessica. It creates a translucent effect and IMO is the best idea ever! When I said that to Toni, she suggested that Wonder Ribbon or Flair, depending upon width, would be great for windows — covering the area, but receding as well. I plan to try it out on Lombard Street and The Neighborhood!
I HOPE to finish this piece since it is my remembrance of Scotland. However, the kit came with two spools of the same color of Accentuate…….
Cheers, Rosie

You must be logged in to post a comment.